It’s been an exciting tour from “Introducing Flutter” to now “building your first application using Flutter.” So far, we have covered almost everything in our Flutter series. It’s high time we end the series by learning to build a basic Flutter application so that you get everything under one umbrella.
The best part about Flutter is that you do not have to spend months learning new languages and frameworks. The process of mobile app development has never been easier with Flutter. Primarily because this technology offers you an advanced level of software kit compiled with all plugins and widgets. For a product owner developing an application with Flutter is no more than an exciting story.
With other databases and software environments, it’s a never-ending battle between Android and iOS. However, with Flutter, you have fewer concerns. So let’s start our final ride by creating a brand new Flutter application together.
Before we start with the development life cycle, let’s quickly glance at a few essential highlights from the past series.
Flash Highlights of Flutter:
- Despite being a brand new technology (launched in 2017), Flutter is used by 39% of the developers worldwide. It will not be surprising if we tell you that Flutter has managed to secure the second position in the topmost preferable framework in cross-platform development.
- Flutter uses Dart as its object-oriented language that works on advanced techniques and compiles the information into native code up to a remarkable speed.
- Flutter utilized the OS in the form of a Canvas base to create an interface and build services such as animations, gestures, and rendering. Meanwhile, you will have complete control over the system to implement services into the framework.
- Compared to other framework and software environments, Flutter has a mild learning curve along with growth opportunities. This allows developers and product owners with a limited programming language to experiment. So you get started with Flutter, even if you are new to the platform.
- Flutter specializes in ready-made and custom widgets for fast UI coding that allows you any level of customization.
- Flutter boasts about its hot reload feature that can elevate the programming speed and ultimately yield productivity to experiment with new things without you bothering about lengthy delays.
- As mentioned previously, Flutter applications are best known for their high performance since they run on CPU usage, no. of frames per second, average response time, no of requests per second, etc.
- Flutter also provides you with excellent portability and migration from any platform. ‘
What Do You Get In A Nutshell?
We are sure all these functionalities and features of Flutter make you dig deeper to get started with your first Flutter application.
Now, you must be wondering how we can possibly create a Flutter application without any technical expertise. All your answers lie ahead.
Creating Your First Application With Flutter :
Flutter is one remarkable easy-to-use technology for application development. Therefore, at the time of writing, we have focused on both technical and novice aspects keeping this article simple and straightforward for you.
Before hopping to the tutorial, we would remind you that you might need XCode for iOS development and Android Studio for Android development. Therefore, it’s best to set up the environment beforehand to make the app development process smoother.
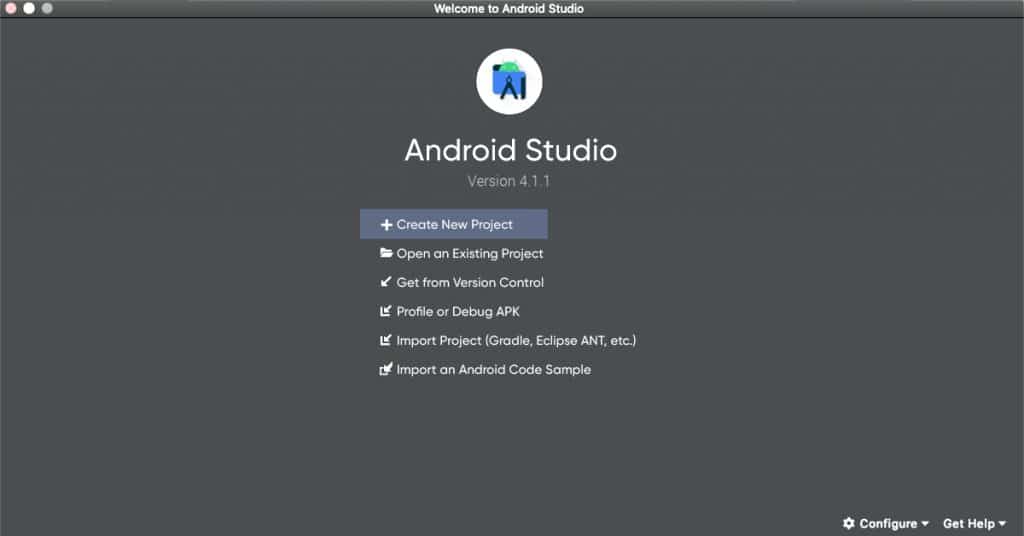
Make sure you have ANDROID STUDIO VERSION 3.0+. In case you don’t, you can follow these simple steps.
Step 1: Install Android Studio :
Android Studio provides you with a complete integrated IDE experience for Flutter. On top of this, you can utilize the Flutter SDK for any required text editor development experience.
However, IDEs come with functionalities such as Syntax highlighting, debugger, and code completion, which can prove to be really effective in the development process.
Now that you know we are starting with Android, there are two alternatives available for you. Android Studio is recommended if you are a tech expert or taking services from a mobile app development company.
Alternatively, you also have the option to use the Flutter plugin IntelliJ :
Here are two core versions that you can use:
IntelliJ IDEA Ultimate Version 2017.1 or later.
IntelliJ IDEA Community Version 2017.1 or later.
In case you decide to use both Android Studio and IntelliJ; keep in mind that you have to restart the IDE to activate your recently launched plugins. Also, this will save you adhering to the stable IDE versions since Flutter plugins do not run properly on Canary, Beta or EAP builds.
Step 2: Install Flutter and Required Dart Plugins
You can follow this with the help of reliable Flutter application development services or on your own to start your project.
- Start the Android Studio.
- Open Plugin reference.
- With macOS ( Go to Preferences>Plugins)
- With Windows and Linux (Go to File>Settings>Plugins)
- Open the Plugin preferences (Configure> Plugins of version3.6.3.0 or later).
- Click and browse repositories of the Flutter plugin and select install.
- Select “yes” when asked to install the Dart plugin.
- Click restart when prompted.
Following the above step, you can create your new Flutter project: File>New>MyFlutterProject.
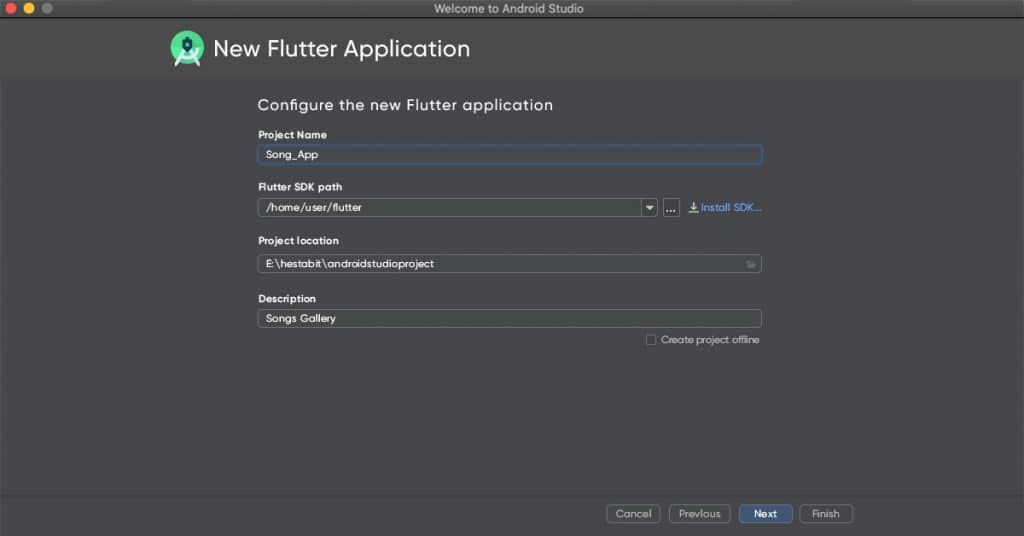
Step 3: Create a New project by “My Flutter Project”
- Once you select the Flutter application, the screen will ask you to provide a Flutter SDK path with a few basic project details.
- Let’s take an example of creating a new “song application” as your Flutter project. So, you need to fill in the details according to a song app.
For Instance:
Song_app/home/user/Flutter. /home/user/AndroidStudioProject. /Song Gallery.
Further, you are required to project a new set of domain names for the package. It’s essential to use a name that is specific to your project and unique (for publishing purposes).
If you don’t own a domain, then you can apply with com.Github.<yourlogin>.
Leave the other options to their default values and confirm by clicking the finish icon.
And Voila! We have officially created your Flutter project.
Step 4: Run the Build: Flutter Doctor.
To ensure that your application environment setup is working correctly, you can visit the terminal ( Alt+F12 in Android Studio) and use the Flutter Doctor command.
You need a usable command Flutter with one working IDE and a connected device (emulator or physical) to apply the function.
Checking the Test Built on Android:
When using the device itself, ensure that you have enabled USB debugging or connected via USB cable.
In the other case of Android Emulator, you might need to build one virtual device. For this, we recommend you to take services from someone who understands the architectural view of Flutter or create an AVD manager by selecting the on-screen toolbar or pressing Alt+F12 and inserting the domain action name.
Rest, leave the default settings as it is on the screen. Now is the time to run your application.
Simply choose the emulator or the desired device and press “Shift+F10” or press the run button directly. When you select the run button, the icon appearing will create changes.
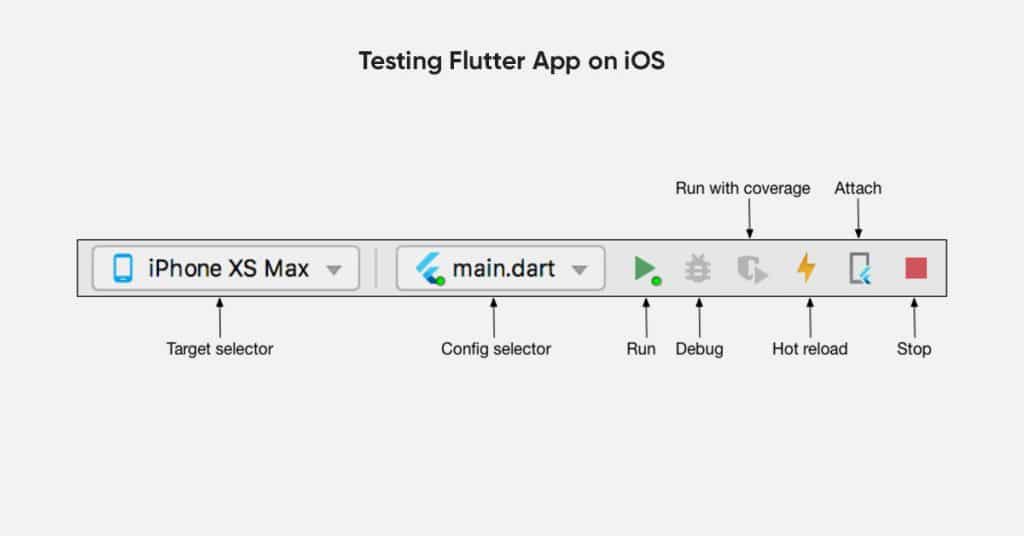
Checking the Test Built on iOS:
While testing the built-in iOS system, you need first to use the dropdown device menu. Keep in mind that the XCode installer will ask you to install the missing components from the application.
Here, some things can be a little complicated to test in a physical device when your device is connected via a USB cable. You might have to unlock it and open the iOS module in XCode.
Once you do that, go to the “signing and capabilities” settings of the application. Sign in to your
Apple ID and after closing the Accounts window; hence, the screen will generate a provisioning profile.
In case you find any error that says your app identifier cannot be registered, it probably means somebody else owns that identifier. To resolve this issue, you can simply change the bundle identifier value to something else.
Once you configure the signing, try running the application via Android Studio. Usually, the first attempt fails because the provisioning file takes time to trust the device.
Meanwhile, testing your application on iOS devices can give unsuccessful results if your Flutter app is provisioned using the Personal Team Provisional File. This happens with devices running on iOS 13.3.1. This limitation is set by Apple itself.
The more complex your application is, the more difficult it becomes to run the test. We strongly recommend taking iOS app development services for this.
Step 5: Code Your Flutter App
Since now you have already created a project with the name Song_app, once you start coding, the directories and files will need editing where the Dart code resides.
You can either replace the contents of lib/main.dart or remove all of the code from lib/main.dart.
Replace the default codes with code that displays “Song Gallery.”
Expert Tip: While pasting your “Song Gallery” code into the application, you can use tools that we installed using Step 1.
After this, you need to test the coding by running it on respective IDEs, as mentioned in Step 4.
Step 6: Insert an External Package:
To keep your task features simple and sorted, we would ask you to use an open-source package with english_folder or english_words. Try using English words that show similar functionalities.
Usually, Flutter app development services find such word packages or other open-source packages on Pub.dev.http://pub.dev./.
Now, insert these new packages in your lib/main.dart repository. You can import it like:
Import ‘package:flutter/material.dart’;
Import’ /package:english_words/english_words.dart’;
Once you start importing, Android Studio will automatically begin to suggest you libraries to import. It will further render the automatic process and ask you to save the imported files and libraries.
Now, you can also use the “english_words” package to generate the required texts instead of using string.
Coming to Flutter’s hot reload feature, you can run your application with the changes you need. Just in case if your app is still not running properly, you can sort the typos or use Flutter’s debugging tools.
For debugging: Try out.
“lib/main.dart”
Step 7 : Add Stateful Widgets
In Flutter app development, everything that is a widget is an application in itself. Stateful and stateless widgets come with changeable and unchangeable circumstances.
Flutter widgets are going to save a lot of effort and time. We are going to keep stateful widgets in your application since the properties of Stateless widgets cannot be changed or updated.
For Stateful widgets, we require two classes:
- A stateful widget class that needs an instance.
- A state class.
The stateful widget class can be regenerated. However, the state class persists lifetime for the widget.
You can add State class by adding Random Word State. To add _RandomWordsState in existing MyAppStatelessWidget,
Create a boilerplate first for a stateful widget and position all your code in lib/main.dart.
Further, enter and return multiple times to start on a new line.
You can enter Random operative words as your widget’s name.
In the end, restart your app to make it behave like an existing one. Every Time it continues displays a word pairing using the hot reload feature and save.
Step 8: Create an Infinite Scrolling View
Image/ Code source : Flutter.dev
- Adding suggestions
lib/main.dart
class _RandomWordsState extends State<RandomWords> {
  final _suggestions = <WordPair>[];
  final _biggerFont = const TextStyle(fontSize: 18.0);
  // ···
}
2. Adding _build suggestion to the _RandomWordState
lib/main.dart (_buildSuggestions)
content_copy
Widget _buildSuggestions() {
  return ListView.builder(
      padding: const EdgeInsets.all(16.0),
      itemBuilder: /*1*/ (context, i) {
        if (i.isOdd) return const Divider(); /*2*/

        final index = i ~/ 2; /*3*/
        if (index >= _suggestions.length) {
          _suggestions.addAll(generateWordPairs().take(10)); /*4*/
        }
        return _buildRow(_suggestions[index]);
      });
}
3. Adding a _build row
lib/main.dart (_buildRow)
content_copy
Widget _buildRow(WordPair pair) {
  return ListTile(
    title: Text(
      pair.asPascalCase,
      style: _biggerFont,
    ),
  );
}


ib/main.dart (build)
content_copy
@override
Widget build(BuildContext context) {
  return Scaffold(
   appBar: AppBar(
     title: const Text('Startup Name Generator'),
   ),
   body: _buildSuggestions(),
  );
}
4. In the My Apps, Updating the Build()
{step3_stateful_widget → step4_infinite_list}/lib/main.dart
 Viewed

	  class MyApp extends StatelessWidget {

	    @override

	    Widget build(BuildContext context) {

	      return MaterialApp(
	- title: 'Welcome to Flutter',

	- home: Scaffold(
	- appBar: AppBar(
	- title: const Text('Welcome to Flutter'),
	- ),
	- body: Center(
	- child: RandomWords(),
	- ),
	- ),
	+ title: 'Startup Name Generator',
	+ home: RandomWords(),
	      );
	    }
5. Restart the App

The final output of your application is going to look something like this with an infinite scroll.
Closing Statement for the Flutter Series:
Congratulations on building your First Flutter application.
We understand the above tutorial can be lengthy and quite hard to follow. If you find errors and typos in any given scenario, it’s best to find a reliable mobile app development company and resolve the personalized issues.
We hope you were able to Flutter your business through our series.